Hugelkultur and horse poo


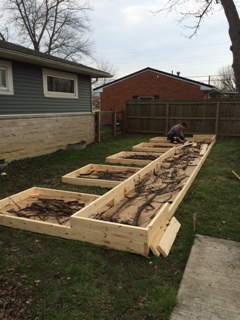
So…what is hugelkultur? I asked that question a few months ago when I stumbled on several articles on the subject. I learned that hugelkultur (hoo-gull-culture) is a centuries-old composting technique that uses large pieces of rotting wood as the nucleus for long term humus building decomposition. The decomp process takes place below the surface, while at the same time allowing you to cultivate the garden bed. This allows your veggie roots to take advantage of nutrients released during the breakdown of the wood. We really liked the idea of building our own organic garden soil instead of spending loads of money on bags of it. That way we would know exactly what was in it and also have a greater connection to our garden.

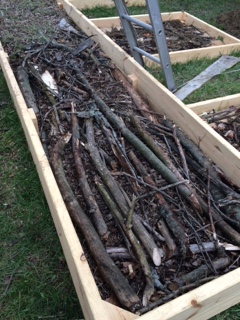
To accomplish this, we first placed a layer of cardboard in the raised beds (I’ve been hoarding cardboard boxes all winter in the garage) to kill the grass and feed the worms, then we filled them in with the wood. Our property has several trees on it so it was easy to find fallen branches and twigs in the yard. Most of the wood we used was seasoned (dried and starting to rot) but we had to fell a large tree this week so we threw in some of the logs we cut even though they were green. Add in some grass clippings to fill in around the logs to give back the nitrogen they will use up during decomp, especially around the green logs, as they will use more!

IMG_6198  IMG_6199

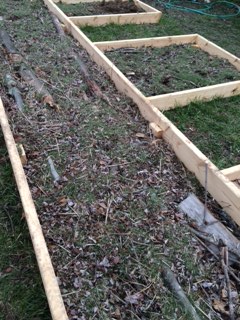
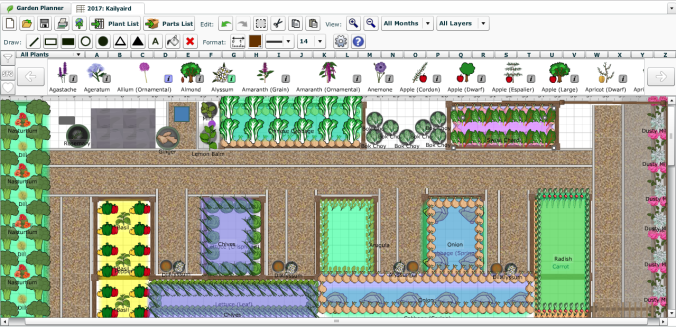
Next, we added compost from our compost pile, seasoned manure, peat moss, and some soil from our yard that was absolutely teeming with worms. I hand mixed these last ingredients together to form the planting layer, but rakes and tillers work just as well.

IMG_6200

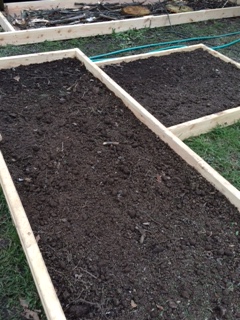
And now all that’s left is to cover the beds for a few days to warm up the soil and start giving my little green lovelies their new homes. You don’t want to shock your seedlings by taking them out of a warm environment and put them in the cold. This week we have Romanesco broccoli and lilac bell peppers coming up strong, as well as a whole slew of tomato varieties that are about 3” high now. My onions haven’t fared well, but I will transplant the few that survived and try direct sowing the seeds into the beds and see how they do.

Once the seedlings are in the hugel beds we plan to put hoop houses over them to protect the plants until they are bigger and stronger, as well as adding an irrigation system. One step at a time though.

Until next time, happy gardening!

Hello spring. Hello allergies.

image1

This is what my garden work station has looked like this week. *Achoo!*

Hello all!

I am really enjoying this spring so far. We have been quite busy with building raised beds, filling them using the hugelkultur (HOO-gul-culture) method, composting, planting even more seeds, and of course trying out new forms of allergy medications.

I will write more in a few days once our beds are finished, but for now check out the progress we made yesterday!

image1 (1)

My sweet husband building away. Several more raised beds will go in this area. More pictures to follow.

Until then, happy gardening!

Well well well, it’s about time, spring.

Garden pic for blogHappy first day of spring!

It’s time to start building and planting the garden beds! I thought I would share a little about my garden plan for this year, the new plants I’m going to try out, and of course the return champions of gardens past.

I don’t know about you, but I get bored with the same old plants every year, the same old seed catalogs, and the planting rut I sometimes find myself in. So this year I decided to try out all sorts of new  (to me at least) heirloom veggies I found in the Baker Creek Heirloom Seeds catalog. And color, I want LOTS of color this year! Of course this adventure means I will probably fail with most of them, at least at first. I read a comment the other day that I thought was apt. It read, “You don’t really know a plant until you’ve killed it at least three times”. I’m not getting too worried about this year because, well,  you have to start somewhere.

My husband put in an order this week for the untreated lumber needed to make two gardens worth of beds. I say two gardens worth because there will be a garden in the back yard where its shady (see above photo), and then what I’m calling the North Sun Kailyaird for the sun loving veggies and flowers. Over the next few weeks we will be building these beds and I will be taking lots of pictures to share our progress with you.

So lets go out to the potting shed and see what’s coming up, shall we? Right now in my little greenhouses I have chives, onions, and asparagus. The asparagus is growing so well and so tall that I’m not sure where to put them anymore. The greenhouse shelves aren’t very high so I may have to rig something up just for them. That’s an area I’ll need to do some more research and keep you apprised of the progress. And I didn’t get as many onions as I would have hoped for, but the ones that came up are growing healthy and strong. As for the herbs and flowers, so far I have planted fennel, sweet alyssum, german chamomile, cosmos, larkspur, echinacea, and marigolds. This week I’ll be starting arugula, baby bok choy, crisphead and leaf lettuce, many kinds of my favorite tomatoes (including black, white, golden, and the most amazing little cherry tomatoes that go from red or yellow to purple), broccoli,  sweet purple peppers, bells of ireland, sage, and salvia. I have to admit, I’m nervous, but excited to start branching out from my typical tomatoes, kale, and squash garden; and to grow an intimacy with a wider range of flora and fauna.

My goal for my yard is to create an oasis, not only for my family, but for bees, butterflies, other insects, and birds (I have a friendly robin that likes to hang out with me when I’m outside). Therefore I’ll be going into more detail later about my plan for encouraging good bugs and birds to make their home in my yard.

Next time though I’ll go into composting and hügelkultur (hoo-gull-culture) and how I plan to involve this centuries-old technique that builds a better compostable structure where your plants will thrive.

Until then, happy gardening!


Seed starting in winter

garden 026

Here is everything I’ve been using for planting my seeds, plus a few other things like old egg cartons (good for planting seeds in as the cardboard will breakdown later) and a makeshift terrarium out of plastic salad containers, a heater for keeping the potting shed warm, and of course a small sampling of my seeds.

If you’re anything like me, I cannot wait to get my hands in some dirt during the long dreary winter months. We are a week away from the first day of spring here, but we got a huge snow storm that rolled through last night! My little utopia right now is my heated potting shed my husband built for me. And for the last month or so I have been starting all kinds of seeds. In this post I will walk you through what I’ve found to work for me and what hasn’t so far. And as always, I am open to suggestion and tips.

I have spent years trying different kinds of seed starting mixes/lighting/watering etc with many, many failures. Or, if the seeds started to grow, they would die pretty quickly from mold. I’ve read, what seems like, every article on seed starting I could get my hands on, and I think I may have finally found a balance, which I will now share with you.

I have never had success with starting seeds in windows (you may have and I would love to hear about it) so we found these little inexpensive greenhouses at Menards. They ran us about $20 a piece and I currently have three. They have four shelves with a reinforced PVC cover. After setup we then hang two grow lights on each level. We found our lights at Menards as well, and we like them because they are Eco friendly, have a metal casing instead of plastic, and they’re cheaper than other models we have tried. Then we zip-tie incandescent (NOT LED as they run cooler and wont heat the seed trays properly) rope lights we bought on Amazon in a zigzag pattern on each shelf to heat the seeds trays. To top off my seed success I’ve been using the seed starting mix from Gardeners Supply. This mix is a little more expensive to start, but I’ve found I have far more seeds germinate and grow into full plants due to the bio blended compost, which is a mix of composted natural materials that contain lots of nutrients and beneficial microbes. Typically, I find their other gardening products to be very pretty but rather expensive, but this seed mix is definitely worth the few extra bucks!

As many of you may know, Cinnamon is a great natural fungicide and rooting agent. When I’m about to plant my seeds I use a 5 gallon bucket to mix in a little cinnamon with the seed starting mix (as we have had quite the difficult battle with mold) and then once the seeds have been planted according to the depth recommended on the seed packet and watered, I sprinkle a light dusting on top of the soil as well for extra measure. Add matching clear plastic dome on top of the seed trays for extra warmth, and you’re all set until sprouts start coming up. Once they sprout then remove the dome for air circulation. I’ve found it helpful to have a small fan at the bottom of the greenhouse set on low to keep the air moving in order to further create an inhospitable environment for mold. Be sure though to check on the soil’s moisture everyday (or even a few times a day to start) to make sure the fan isn’t drying the soil out too much. In that case remove the fan and just make sure to open the greenhouses and let fresh air in every day. Remember to keep the soil moist but not flooded.

I then use my large garden sprayer on a very fine mist setting with a tablespoon of Safer 3 in 1 concentrate to help in the mold battle and to keep the soil flies down to a minimum. Don’t worry if you see them flying around in there, as long as you keep them controlled they wont hurt your plants. They’re just annoying and have the tendency to fly right into your face. This diluted mixture has been a success so far!

Once my plant babies (as my husband calls them) have their first adult leaves I mix up some worm casting (or worm poo) tea. The seedlings at this point have started to use up the nutrients in the soil and will need an extra kick to aid in their maturing process. There are MANY recipes out there, but I started mine off with a cup of worm castings to a gallon of warm water. I use washed out vinegar jugs and I shook the jugs a few times a day for about 24 hours. I then strained the mixture through a thin cloth into my large sprayer to water the seedlings. The day after I started using this solution they all sprung to attention and have already gown quite a bit! I still use the Safer 3 in 1 concentrate in a smaller sprayer if I see areas that are getting a bit of that dreaded white fluffy mold. If you haven’t already figured it out, I seriously hate the stuff.

So that’s where I am right now with my seedlings. I should mention I’ve invested in the Mother Earth News gardening app for my computer in my potting shed. Now, I want to be clear that I am in no means getting any commission or rewards from them when I say I truly love this thing! I can map out my garden in detail and I get regular email reminders when its time to plant, transplant, cover due to frost, companion plants, bug warnings etc etc etc. It keeps everything organized so I can focus on the plants instead of frantically trying to keep track of everything. I know a lot of people that have no problem doing all of that themselves, but even though I’ve been gardening for years, I still feel like a beginner in so many ways. Plus, I’m trying out a bunch of new plants that I’ve never grown before (which I will go into more with my next post), as well as having the largest garden that I’ve ever had. So this app helps me to focus on fewer things in the garden so I can keep the rest of my focus on my family.

Well that’s all for now, until next time, happy gardening!